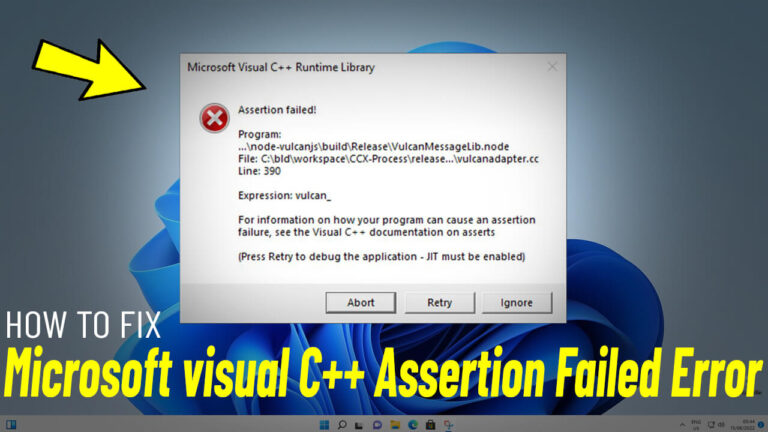
How to Fix “Windows Resource Protection Could Not Start the Repair Service” Error in Windows 11/10/8/7 ✅
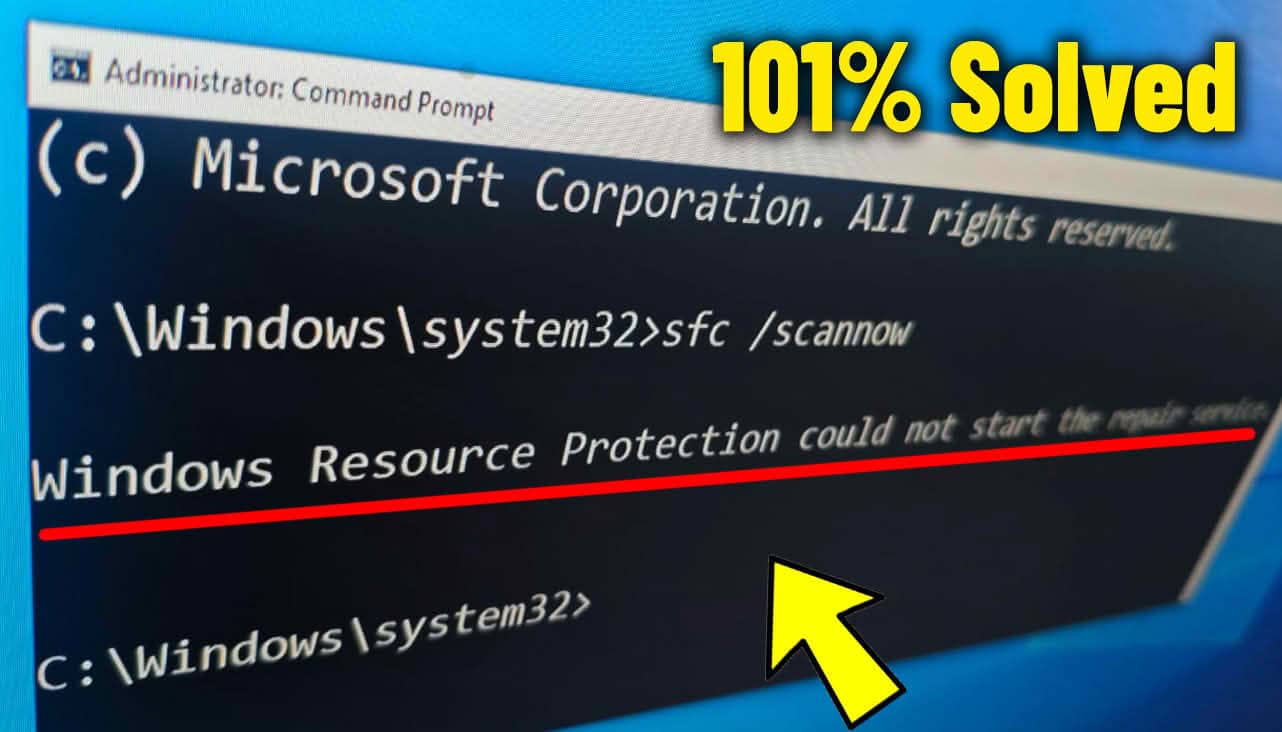
If you’ve ever tried to run the System File Checker (sfc /scannow) on your Windows PC—only to be met with the frustrating “Windows Resource Protection Could Not Start the Repair Service” error:
“Windows Resource Protection could not start the repair service.”
—you’re not alone. The “Windows Resource Protection Could Not Start the Repair Service” issue is common yet critical, preventing Windows from repairing corrupted or missing system files. Left unresolved, it can lead to system instability, performance degradation, or even boot failures.
The good news? This error is almost always fixable—and in most cases, without losing your personal files or reinstalling Windows from scratch.
In this comprehensive, step-by-step guide, we’ll walk you through eight proven solutions to resolve the “Windows Resource Protection Could Not Start the Repair Service” error across Windows 11, 10, 8, and 7. We’ll start with the simplest fixes and gradually move to more advanced troubleshooting methods—ensuring you have every tool you need to restore your system’s integrity.
Table of Contents
🔍 What Causes the Windows Resource Protection Could Not Start the Repair Service Error?
Before diving into fixes, it’s essential to understand why this error occurs.
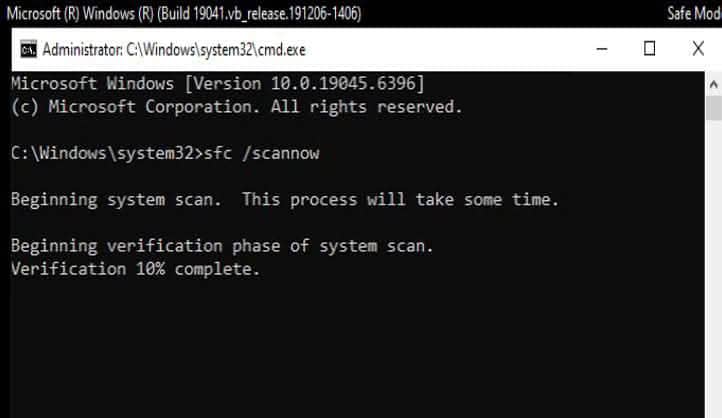
The “Windows Resource Protection could not start the repair service” message typically appears when you run:
sfc /scannow
This command relies on the TrustedInstaller service (officially named Windows Modules Installer) to scan and repair protected system files. If this service is:
- Disabled
- Not running
- Blocked by permissions
- Corrupted
…then SFC can’t launch the repair process—hence the error.
Common triggers include:
- Malware infections
- Incorrect system permissions
- Third-party software interference
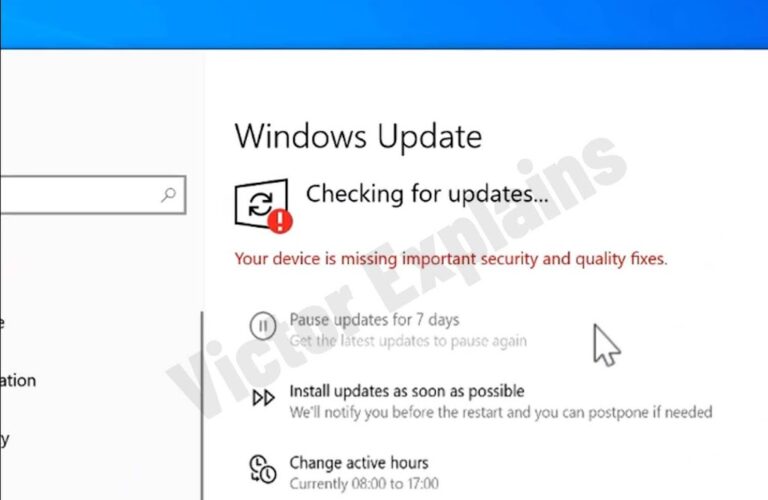
- Failed Windows updates (learn more about fixing Windows update errors)How to Resolve the “Your Device Is Missing Important Security and Quality Fixes” Error in Windows 10 Update
- Registry or service configuration errors
Now, let’s fix it.
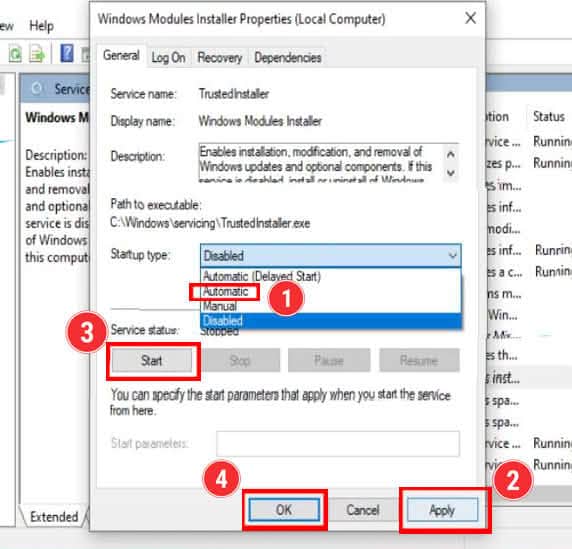
Solution 1: Fix Windows Resource Protection Could Not Start the Repair Service by Enabling Windows Modules Installer
This is the most frequent and effective fix. The Windows Modules Installer service may be disabled or stopped.
Step-by-Step:
- Press Windows + R, type
services.msc, and press Enter. - Scroll down and locate Windows Modules Installer (also listed as TrustedInstaller).
- Double-click it to open its properties.
- Set Startup type to Automatic.
- Click Apply.
- If the service status says “Stopped,” click Start.
- Click OK.
- Now open Command Prompt as Administrator and run:cmd
sfc /scannow
✅ Success? If yes, the issue was simply a disabled service. If not, proceed to the next solution.
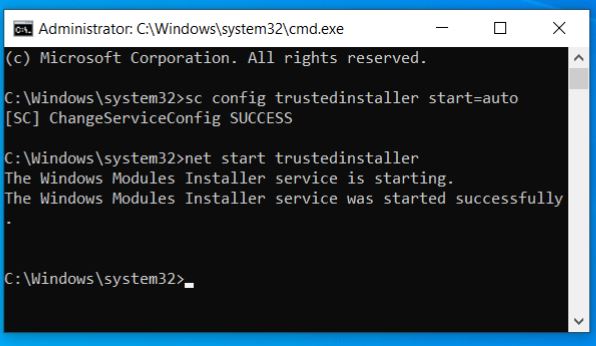
Solution 2: Resolve Windows Resource Protection Could Not Start the Repair Service via Command Prompt
If the service refuses to start through the GUI, use the command line to force it.
Steps:
- Right-click Start → Windows Terminal (Admin) or Command Prompt (Admin).
- Run these commands one at a time, pressing Enter after each:cmd
sc config trustedinstaller start=auto
net start trustedinstaller
You should see a message like:The Windows Modules Installer service is starting. The Windows Modules Installer service was started successfully.
Now run:
sfc /scannow
💡 Note: The space after start= is required in the sc config command.
Solution 3: Fix Permissions on the WinSxS Folder
The WinSxS (Windows Side-by-Side) folder stores all core Windows components. If administrators lack full control, SFC can’t access or repair files.
How to Fix:
- Open Command Prompt as Admin.
- First, check current permissions:cmd
ICACLS C:\Windows\winsxs
If you see “Access Denied” or missing admin rights, grant full control:
ICACLS C:\Windows\winsxs /grant administrators:F /T
/grant administrators:F= Full control for Administrators/T= Apply recursively to all subfolders and files
- Wait for the command to complete (may take several minutes).
- Restart your PC.
- After reboot, run
sfc /scannowagain.
⚠️ Warning: Modifying WinSxS permissions should only be done when necessary. Avoid deleting or moving files from this folder.
Image Prompt:
3 img
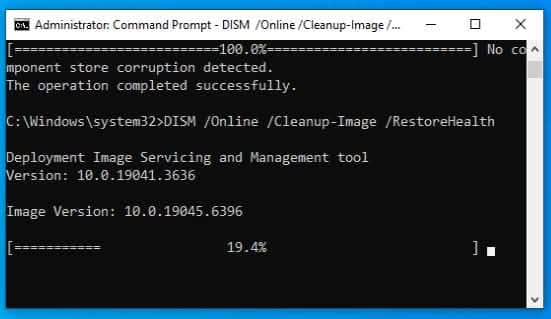
Solution 4: Fix Windows Resource Protection Could Not Start the Repair Service with DISM (Windows 10/11)
If SFC keeps failing, the underlying component store may be corrupted. DISM (Deployment Imaging Service and Management Tool) repairs this store.
Steps:
- Open Command Prompt as Administrator.
- Run these commands in order:
DISM /Online /Cleanup-Image /CheckHealth
DISM /Online /Cleanup-Image /ScanHealth
DISM /Online /Cleanup-Image /RestoreHealth
3. The /RestoreHealth step may take 10–30 minutes and requires internet access (to download replacement files from Windows Update).Once complete, restart your computer.Now run:
sfc /scannow
✅ This combo (DISM + SFC) resolves over 90% of persistent system file errors.
Solution 5: Troubleshoot Windows Resource Protection Could Not Start the Repair Service in Safe Mode
Third-party apps, drivers, or background services can interfere with SFC. Safe Mode loads only essential components.
How to Boot into Safe Mode:
- Press Windows + R, type
msconfig, hit Enter. - Go to the Boot tab.
- Check Safe boot → select Minimal.
- Click OK → Restart.
- After rebooting into Safe Mode:
- Open Command Prompt as Admin
- Run
sfc /scannow
- Once done, repeat Step 1–2, uncheck Safe boot, and restart normally.
💡 Alternative (Windows 11/10):
Hold Shift while clicking Restart → Troubleshoot → Advanced Options → Startup Settings → Restart → Press F4 for Safe Mode.
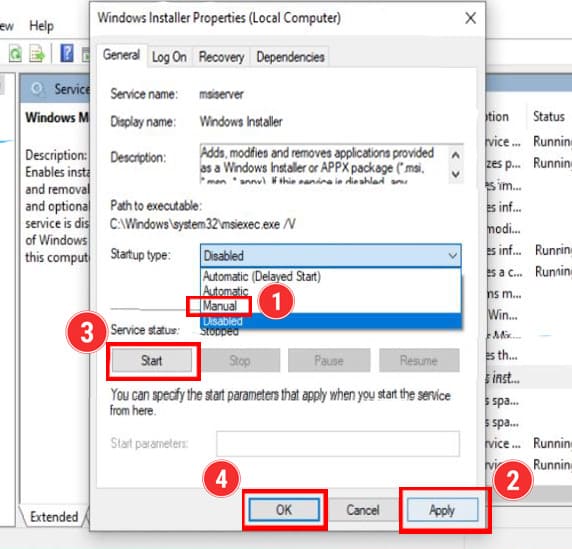
Solution 6: Verify Windows Installer Service
While less common, a corrupted Windows Installer service can indirectly affect TrustedInstaller.
Steps:
- Press Windows + R → type
services.msc→ Enter. - Find Windows Installer.
- Ensure:
- Status: Running (or “Stopped” is okay if startup is Manual)
- Startup type: Manual (do not set to Automatic)
- If stopped, right-click → Start.
- Reboot and test
sfc /scannow.
Note: The Windows Installer service is primarily for MSI installations, but system integrity checks may depend on it indirectly.
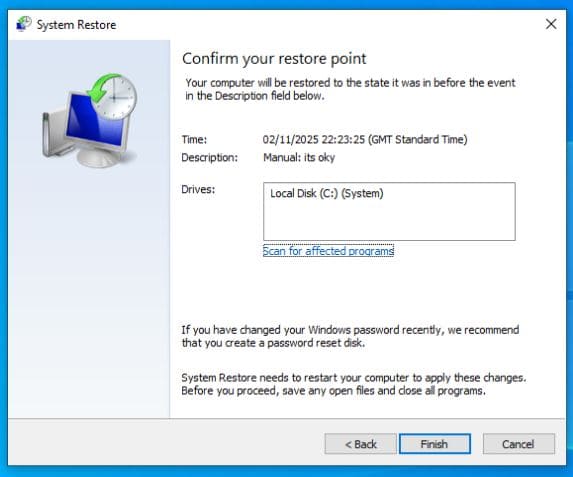
Solution 7: Perform a System Restore
If the error appeared after a recent change (update, software install, etc.), roll back with System Restore.
Steps:
- Press Windows + R, type
rstrui, press Enter. - Follow the wizard to choose a restore point from before the issue began.
- Confirm and let Windows restore your system.
- After reboot, run
sfc /scannow.
✅ This is non-destructive—your personal files remain intact.
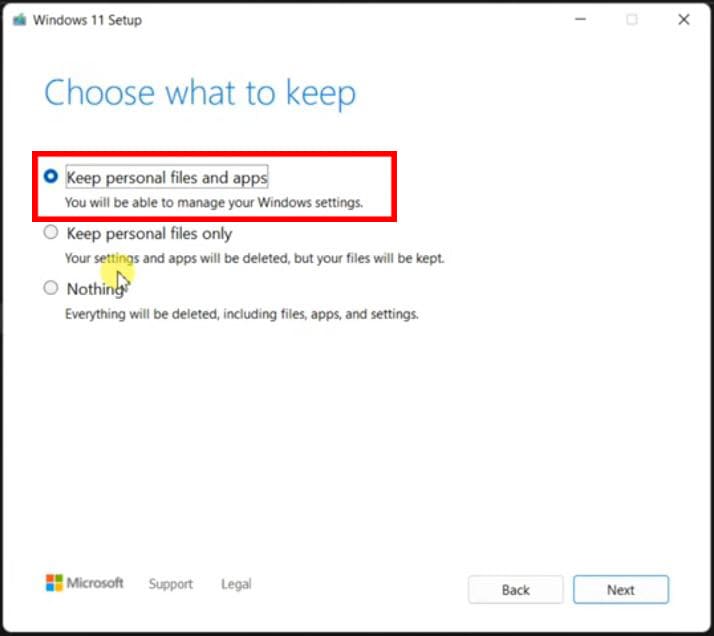
Solution 8: In-Place Upgrade (Repair Install)
When all else fails, perform a repair installation—Windows reinstalls itself without deleting your files, apps, or settings.
Steps:
- Go to Microsoft’s Windows 11/10 Download Page .
- Download the Media Creation Tool or ISO file.
- Mount the ISO or run the tool.
- Launch Setup.exe from the mounted drive.
- Select “Upgrade this PC now”.
- Choose “Keep personal files and apps”.
- Let the installation complete (may take 30–60 mins).
This replaces all system files with fresh copies—effectively resetting Windows core components while preserving your data.
Final Verification
After applying any of the above fixes:
- Open Command Prompt as Administrator.
- Run:
sfc /scannow
- If successful, you’ll see:
“Windows Resource Protection did not find any integrity violations.”
or
“Windows Resource Protection found corrupt files and successfully repaired them.”
🎉 Congratulations! Your system is now protected and self-healing.
🔒 Pro Tips to Prevent Future Errors
- Avoid third-party “cleaner” tools that modify system folders.
- Keep Windows updated—many SFC issues stem from outdated components.
- Run SFC monthly as maintenance
sfc /scannow
- Use antivirus software to prevent malware from tampering with system services.
❓ Frequently Asked Questions
Q: Will these fixes delete my files?
A: No. All solutions (except a full reset) preserve your personal data.
Q: Can I run DISM and SFC together?
A: Yes—and you should. Always run DISM first, then SFC.
Q: What if SFC still fails after all steps?
A: Your Windows installation may be severely corrupted. Consider backing up data and performing a clean install.
Final Thoughts
The “Windows Resource Protection Could Not Start the Repair Service” error is more common than you think—but it’s rarely catastrophic. With the right approach, you can fix the Windows Resource Protection Could Not Start the Repair Service issue and ensure your Windows system remains stable, secure, and self-repairing.
Start with Solution 1 (fixing Windows Resource Protection Could Not Start the Repair Service by enabling TrustedInstaller), and work your way down. Most users resolve the Windows Resource Protection Could Not Start the Repair Service error within the first three fixes.
Got questions? Drop them in the comments below—and don’t forget to share this guide with others battling the same Windows error!

Excellent explanation — the visuals were worth a thousand words.
This cleared up a lot of uncertainty — I feel more confident now.
Thank you for the clear roadmap — it makes the process less intimidating.
You’re very welcome! I’m really glad to hear the roadmap made things clearer for you. 😊 Thanks for taking the time to share your feedback!