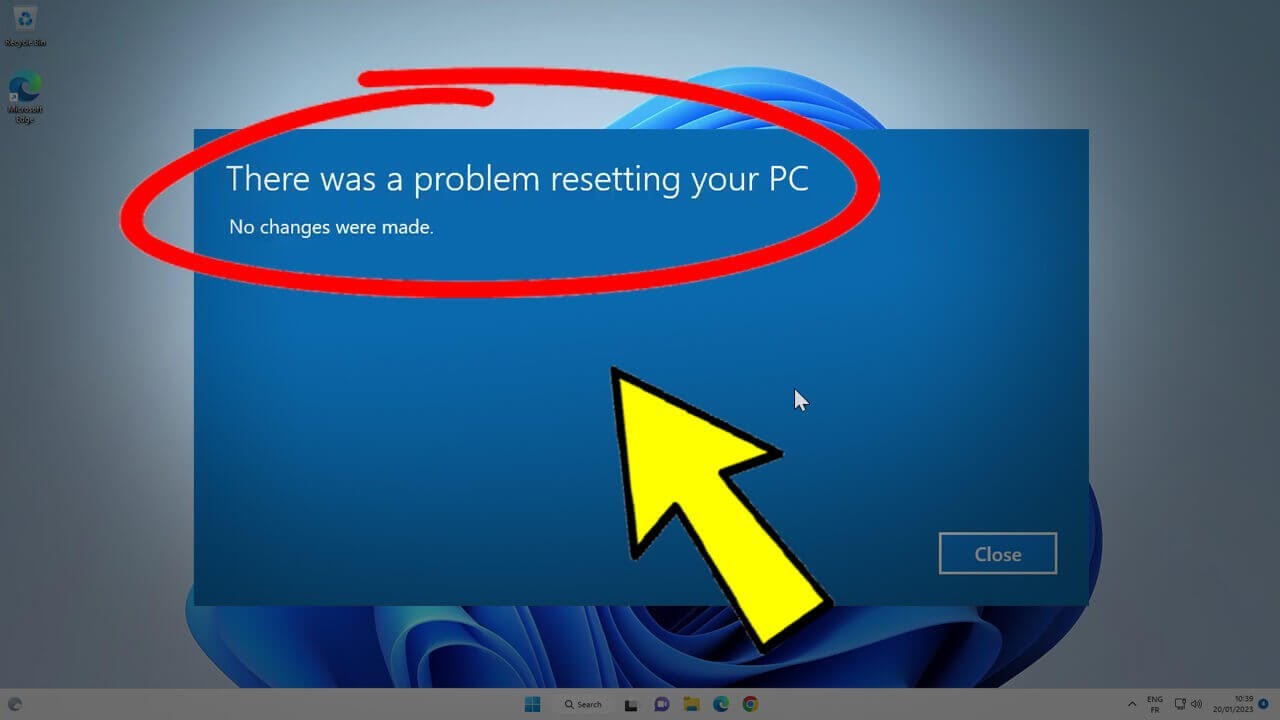
How to Fix “There Was a Problem Resetting Your PC – No Changes Were Made” Error in Windows 11/10
To fix there was a problem resetting your pc error, you need to understand what causes it. If you’ve ever tried to reset your Windows 11 or Windows 10 PC—only to be met with the frustrating error message “There was a problem resetting your PC. No changes were made”—you’re not alone. This common but cryptic error can halt your troubleshooting efforts, leaving your system stuck in a loop of failed recovery attempts. Learning how to fix there was a problem resetting your pc error is essential for restoring your system to full functionality.
The good news? This issue is almost always fixable without losing your personal files—provided you follow the right steps. In this comprehensive, step-by-step guide, we’ll walk you through seven proven methods to fix there was a problem resetting your pc error, including:
Table of Contents
Whether you’re a casual user or a tech-savvy enthusiast, these solutions are designed to be safe, effective, and beginner-friendly. By following these proven techniques, you’ll be able to fix there was a problem resetting your pc error and get your Windows reset working again!
Why Does This Error Occur?
Before diving into fixes, it helps to understand why this error happens. The “There was a problem resetting your PC” message typically appears when Windows fails to access or initialize the Windows Recovery Environment (WinRE)—a hidden partition or file system component essential for factory resets, system restores, and advanced troubleshooting.
Common causes include:
- Corrupted or missing WinRE configuration
- Damaged system files or registry hives
- Disabled recovery environment
- Disk errors or partition misalignment
- Failed Windows updates
The methods below directly address these root causes to help you fix there was a problem resetting your PC error—from quick online repairs to full system reinstalls.
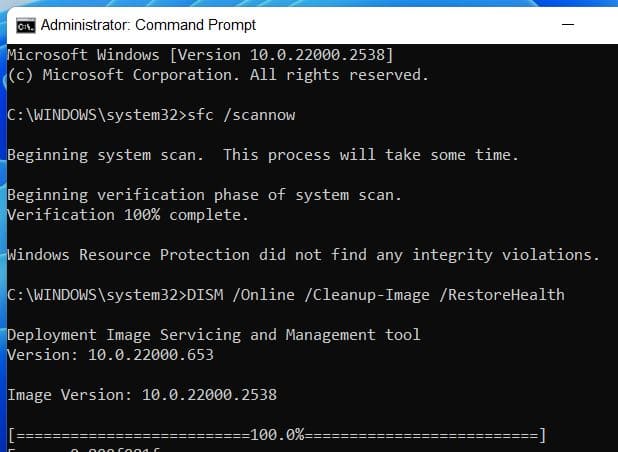
Method 1: How to Fix There Was a Problem Resetting Your PC Error Using SFC and DISM
If your PC can still boot into Windows, start with the simplest and safest way to fix there was a problem resetting your PC error: repairing system files using built-in tools.
Step-by-Step Instructions:
- Open Command Prompt as Administrator
- Press
Windows + S, type Command Prompt, right-click it, and select Run as administrator.
- Press
- Run System File Checker (SFC)
Type the following and press Enter: cmd
sfc /scannow
This scans for and repairs corrupted protected system files. Wait for it to complete (may take 10–20 minutes).
3. Run DISM to Restore Windows Image Health
Next, run:
DISM /Online /Cleanup-Image /RestoreHealth
This command downloads healthy files from Windows Update to replace damaged ones in your OS image. Be patient—it can take 15–30 minutes
4. Restart and Try Reset Again
After both commands finish successfully, restart your PC and attempt Settings > System > Recovery > Reset this PC.
✅ Success Tip: If SFC reports “Windows Resource Protection found corrupt files and successfully repaired them,” your reset may now work.
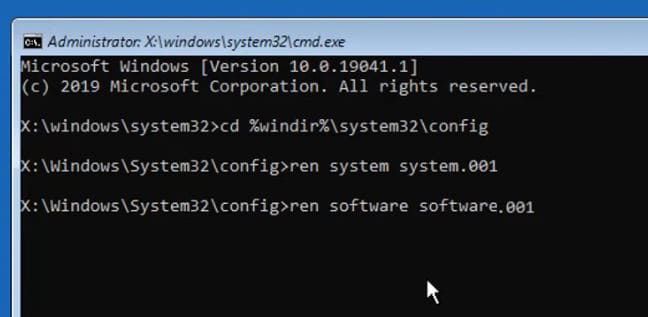
Method 2: Rename Corrupted Registry Hive Files
Sometimes, the SYSTEM and SOFTWARE registry hives in C:\Windows\System32\config become corrupted, blocking reset operations. This method will help you fix there was a problem resetting your pc error by renaming them, which forces Windows to rebuild clean versions on next boot.
⚠️ Warning: Only do this if you can access Command Prompt as admin. Incorrect changes can cause boot failure.
Step-by-Step Instructions:
- Open Command Prompt as Administrator (as in Method 1).
- Navigate to the Config Folder
Run: cmd
cd %windir%\system32\config
Rename the Critical Registry Files
Execute these commands one at a time:
ren system system.001
ren software software.001
- Restart Your PC
Windows will detect the missing hives and automatically generate fresh ones during startup. - Try Resetting Again
Go to Settings > System > Recovery > Reset this PC, or use Advanced Startup (Shift + Restart) and choose Troubleshoot > Reset this PC.
You can now safely select Keep my files or Remove everything.
💡 Note: This method may reset some system settings (like default apps), but your personal files remain untouched.
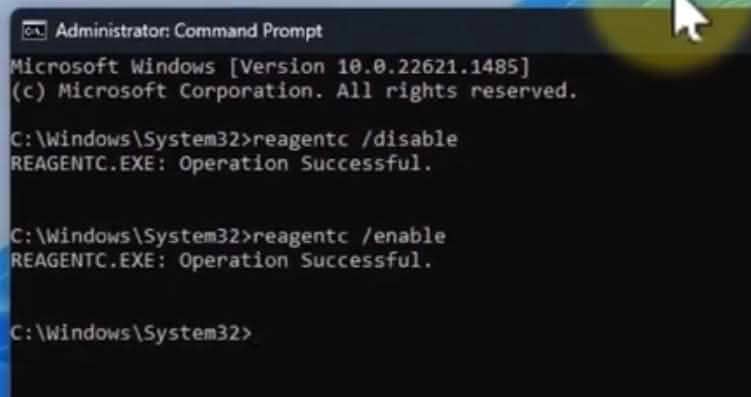
Method 3: Re-enable Windows Recovery Environment Using reagentc
The Windows Recovery Environment (WinRE) must be properly enabled for any reset operation to succeed. If it’s disabled or misconfigured, Windows can’t proceed—even if all other components are intact.
Step-by-Step Instructions:
- Open Command Prompt as Administrator
- Disable WinRE cmd
reagentc /disable
3. Re-enable WinRE
reagentc /enable
4. Verify Status
reagentc /info
Confirm “Windows RE status: Enabled” appears.
💡 If you receive an error like “REAGENTC.EXE: Windows RE cannot be enabled,” your recovery partition may be missing. Proceed to Method 4.
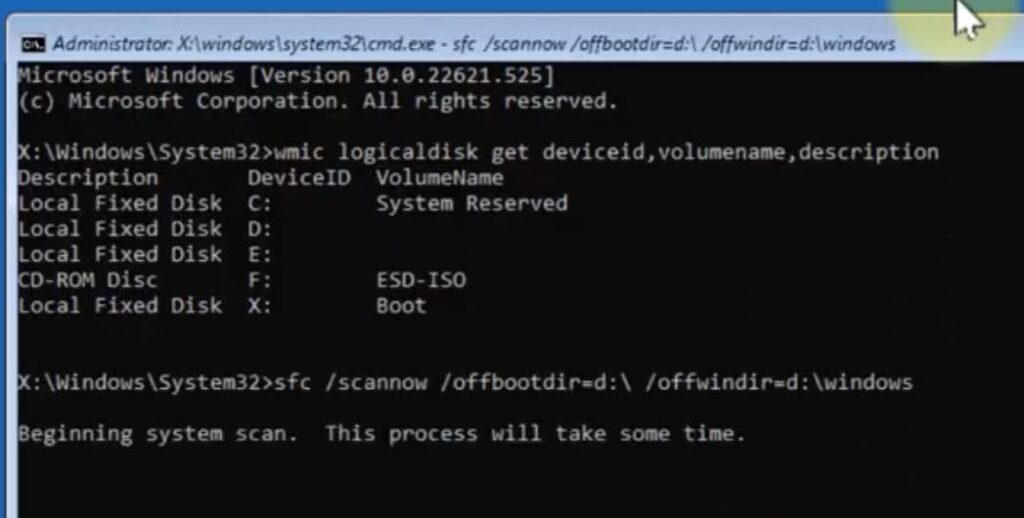
Method 4: Run Offline System File Checker (SFC) from Recovery Environment
If Windows won’t boot or online SFC fails, this alternative method to fix there was a problem resetting your pc error involves running SFC offline from the recovery environment.
Step-by-Step Instructions:
- Boot into Advanced Startup
Hold Shift while clicking Restart. - Open Command Prompt
Go to Troubleshoot > Advanced Options > Command Prompt. - Identify System Drive
Run: cmd
wmic logicaldisk get deviceid,volumename,description
Note the drive letter (e.g., D:) for your Windows installation.
Run Offline SFC
Replace d with your actual drive letter:
sfc /scannow /offbootdir=d:\ /offwindir=d:\windows
- Wait and Restart
Allow 10–30 minutes. After completion, restart and retry reset.
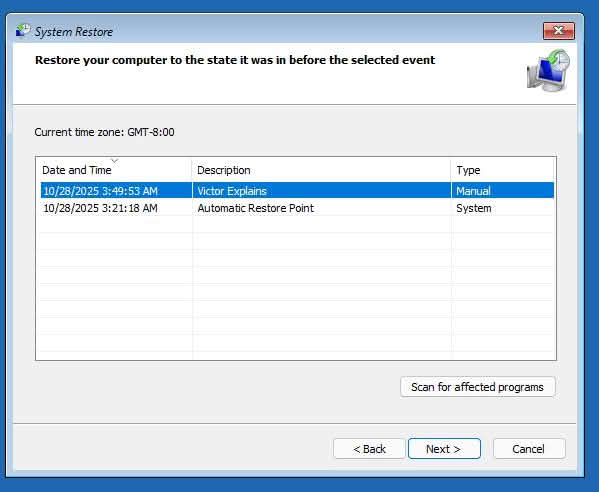
Method 5: Run System Restore from Windows
If your PC boots normally and you have a restore point, using System Restore is an effective way to fix there was a problem resetting your pc error. It can revert system files and settings to a working state—without affecting personal files.
Step-by-Step Instructions:
- Press Windows + R, type
rstrui, and press Enter. - Click Next on the welcome screen.
- Select a restore point created before the issue started.
- (Optional) Click Scan for affected programs to preview changes.
- Click Next, then Finish to confirm.
- Your PC will restart and begin restoration. Wait 10–30 minutes.
🔄 System Restore does not delete your documents, photos, or emails—it only rolls back system files, registry, and installed programs.
Method 6: Perform a Fresh Install (Last Resort)
If all else fails and you’re still unable to fix there was a problem resetting your pc error, a clean Windows install is the most reliable solution.
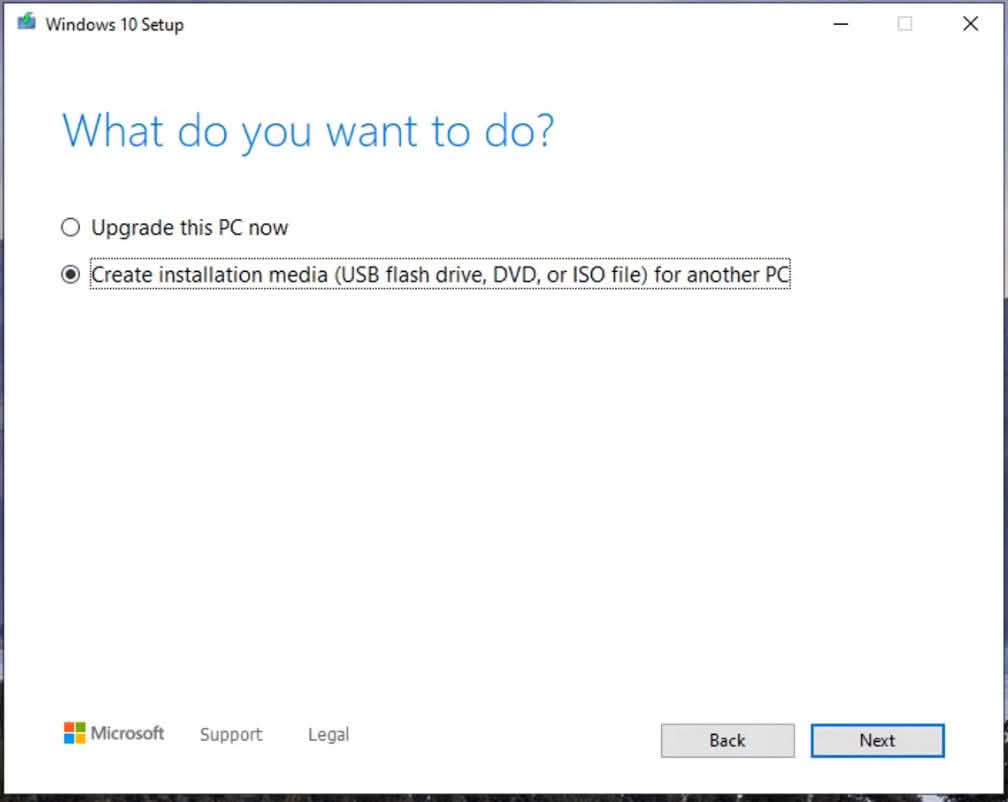
Step-by-Step Instructions:
- Back up all personal files to an external drive or cloud storage.
- Download Microsoft’s Media Creation Tool from Microsoft.com
- Create a bootable USB drive (8GB or larger)
- Boot from USB (change boot order in BIOS/UEFI if needed)
- Install Windows fresh
- Delete all partitions during setup for a true clean slate
- Reinstall apps and restore files afterward
✅ A clean install resolves 99% of deep system corruption issues and often improves performance.
Bonus: Prevent Future Reset Failures
Once your system is restored and you’ve successfully managed to fix there was a problem resetting your PC error, take these steps to avoid this error in the future:
- ✅ Run sfc /scannow monthly
- ✅ Keep WinRE enabled (reagentc /info)
- ✅ Create a recovery drive (Control Panel > Recovery)
- ✅ Enable System Protection and create manual restore points before major updates
- ✅ Maintain regular backups (OneDrive, File History, or external drive)
Troubleshooting FAQ
❓ Can I reset my PC without losing files?
Yes! Use “Keep my files” during reset or System Restore. Always back up first.
❓ What if reagentc /enable fails?
Your WinRE image is likely missing. Use installation media to repair or reinstall.
❓ Does renaming system/ software files delete my data?
No—it only resets system registry hives. Personal files remain intact.
❓ How long does DISM take?
Typically 15–30 minutes, depending on internet speed and system health.
Final Thoughts
The “There was a problem resetting your PC – no changes were made” error is frustrating but fixable. With these seven methods, you now have a complete toolkit—from quick online repairs to full system reinstalls.
Start with Method 1 (SFC + DISM) if your PC boots and you need to fix there was a problem resetting your PC error. If not, jump to Method 4 (offline SFC) or Method 7 (clean install). Most users successfully resolve the issue by Method 3 or 4.
🔧 Pro Tip: Bookmark this guide. Share it with friends. And remember—back up your data before attempting any major system changes.
After following these comprehensive methods to fix there was a problem resetting your pc error, your Windows PC can be restored to full health. You’ve got this!
Finally, a rental management software that combines both lease management and accounting tools! Looks like a solid fit for property management companies of any size.
Solid suggestions — would be great to see a downloadable checklist.